
|
Home - quick manual for TXsoil - HTTP / MQTT - forum TXsoil - VVSoil - TXdata - TXtemp - contact us...
TXsoil (standard WiFi/RF/GSM)
Measures the soil moisture and transmits it (low consumption) in WiFi HTTP or MQTT and/or RF and/or via GSM/HTTP
(version E, GSM) available
|

|
We have also TXtemp (temperature) and TXdata (tx of anything)
It is interesting to measure the humidity of the ground, but we have also thought about other things; and then we have TXtemp to measure the temperature (one of the uses of TXtemp is in association with SuperClock), and for practically any type of measurement we have TXdata (RS232, RS485 ModBus) - which can be connected to thousands of existing third-party professional RS232 or ModBus meters (and there is something for all needs: temperature and humidity meters, anemometers, voltage meters, energy, light meters, water meters, presence sensors, brightness sensors, soil humidity sensors, etc. ; practically all professional meters are available in ModBus or RS232 standard; and not just meters).
The ways in which TXtemp TXsoil TXdata can work: supported by VisualVision products or used for generic automation via WiFi / GSM / HTTP or WiFi / MQTT
We tried to build an organic system so that whoever gets a TXtemp, TXsoil sensor or a bridge for RS232 or ModBus sensors and devices like TXdata can immediately use them without wasting time in configurations (and we also took the opportunity to insert some things into our system some "extra" not foreseen by the standards!).
But we didn't want to do a "closed system". We have also included the most widespread industrial standards, HTTP and MQTT, so that our elements can be used in any automation.
|
|
Quick manual for TXsoil
A. CONFIGURE STANDARD / RF VERSION WITH CONTROLHUB DISPLAYRX OR RXTXEASY AS RECEIVER
1) turn on by pressing the power button
2) connect to the wfeasy.com WiFi
3) connect with the browser (Chrome, Firefox, Safari, etc.) to the wfeasy.com site, here is the QR:

4) the configuration screen appears indicating the WiFi channel on which to transmit and/or (in the versions that provide it) the RF433 channel

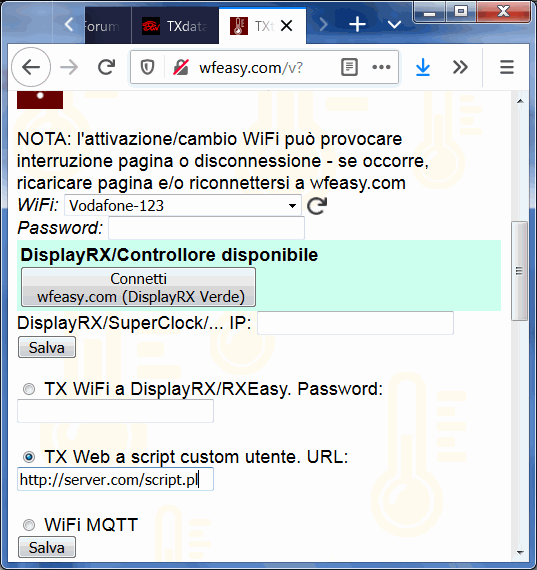
5) if you have chosen a WiFi channel, make sure that the receiving device is turned on (whether it is DisplayRX, ControlHUB or RXTXeasy GSM- or your WiFi if you choose to send data to your Web server or to a device with Web server / Internet) then select the "Settings" menu
6) scroll the page until you find the WiFi section, select the WiFi of the above device (possibly have it redo a WiFi search with the appropriate reload button; if it is one of the VV devices it will find it automatically and give a to connect), or your WiFi; enter if you need the WiFi password, "Save" (sometimes it disconnects here; just reconnect)

7) make sure to always enter the password of use on the same page, but below it (for example if you are "connected" to ControlHUB and the access password of ControlHUB is mickeymouse, here it should be written mickeymouse)
8) alternatively you can use any WiFi and specify the IP of the receiving device (eg DisplayRX, ControlHUB)
B. CONFIGURE THE WiFi VERSION TO TRANSMIT HUMIDITY TO THE WEB SERVER
1) connect etc. as in point A
2) right under WiFi settings, instead of WiFi TX to Hub / DisplayRX / RXeasy, choose the other settings and write your server / script URL. The data is sent via the usual CGI/GET standard, click here for the format...
C. CONFIGURE THE GSM VERSION TO TRANSMIT THE SOIL MOISTURE DATA TO YOUR WEB SERVER (OR TO THE CONTROLHUB'S INTERNAL WEB SERVER)
1)1) connect etc. and go to Settings as in point B
2) the GSM version also allows you to indicate a possible PIN (leave blank if there is no PIN) and the operator's APN (possibly you can search for it on Google). As for WiFi, the URL of the server/script that will receive the data transmitted according to very simple specifications, the same of the WiFi/HTTP mode (click here...).

3) in the event that you transmit to a ControlHUB that is accessible via the Web thanks to a static IP or a Dyn DNS (see ControlHUB website), you will need to write the internal ControlHUB script as a script, that is:
(IP STATICO 123.45.67.12) http://123.45.67.12/x
(DYN DNS pippo.dyndns.com) http://pippo.dyndns.com/x
D. OTHER OPTIONS, NIGHT DEACTIVATION OR AT A CERTAIN TIME INTERVAL, CALIBRATION
After connecting as for point B, in the Settings it is possible to define a name for the device, and if the reading periodicity is less than 250 minutes, you can set an interval of hours in which the reading is not carried out / transmitted (for example you can disable the night).
Still in the Settings, you can re-run the calibration (we calibrated it in the factory but you can recalibrate it):
- leaving the probe totally dry (and drying it well for safety with a cloth), click the "humidity 0%" button
- by immersing the probe in water or in a soaked ground or in a ground that you want to be considered with 100% humidity, click the "humidity 100%" button and the reference will be stored.
E. SETUP FOR MQTT OPERATION, EG. FOR HOME ASSISTANT, AUTOMATION, DOMOTICS
1) connect etc. as for B. and go to Settings. You will need to connect to a WiFi (home, work, laboratory, etc.) through which an MQTT Broker or the Internet is available. In the WiFi settings (as in the figure above illustrating B), choose "WiFi MQTT".
Immediately after the WiFi settings, below the page, there are the MQTT ones.
You can enter the data relating to the MQTT Broker you want to use; the name of the Topic to be used to control it and to read the periodic transmissions of the humidity percentage is shown.
Basically, to receive the humidity data, just listen on the topic tx-o-nameofthedevice
|